AutoDiscovery: Beating cuBLAS on Hopper & Co-Designing a 32-SM Edge Accelerator
NVIDIA’s cuBLAS library represents thousands of engineer-hours of hand-tuned assembly for matrix multiplication – the operation behind every linear layer, attention head, and MLP block in modern deep learning. On the Hopper GPU, it achieves ~718 TFLOPS for a 4096x4096 BF16 matmul, roughly 73% of the GPU’s theoretical peak.
We beat it. An AI agent, starting from a textbook-naive kernel and iterating autonomously, reached 751 TFLOPS – 1.05x cuBLAS –. Then we went further: in a second campaign, the same agent co-designed both the kernel and the GPU microarchitecture for a simulated 32-SM edge architecture, cutting cycle count by 54.3%.
The system driving both campaigns is AutoDiscovery, a framework for autonomous optimization. Given a target metric, an evaluation harness, and a search space, the agent operates in a closed loop: observe, hypothesize, implement, measure, keep or revert – repeating until convergence. The human defines the problem; the agent drives the iteration. What changes between use cases is the search space and the harness. In Part I, the search space is CUDA kernel code and the harness measures TFLOPS on real hardware. In Part II, it expands to include GPU microarchitecture parameters, evaluated through cycle-accurate simulation.
Part I – Beating cuBLAS on Hopper
Why matrix multiplication?
Matrix multiplication (GEMM) is the computational backbone of deep learning. In a typical LLM inference pass, GEMM accounts for 60-80% of total GPU time. Optimizing it directly translates to cheaper and faster model serving. And because cuBLAS is most aggressively tuned for square matrices, a 4096x4096 BF16 multiply is the hardest benchmark to beat – and therefore the most interesting.
The setup
- Hardware: NVIDIA H200 NVL, 132 SMs, HBM3 at 4.8 TB/s, FP16 tensor peak ~989 TFLOPS
- Problem: C = A x B, M=N=K=4096, BF16
- Baseline: cuBLAS
cublasGemmExat ~718 TFLOPS - Goal: Write a CUDA kernel from scratch that exceeds cuBLAS throughput
The approach: start from a trivially simple kernel and progressively apply every known optimization technique – shared memory tiling, tensor core instructions, warp specialization, memory hierarchy tuning – measuring throughput at each step. An autonomous agent (GitHub Copilot) drives the iteration loop: propose a hypothesis, implement it, benchmark, keep or revert.
Starting from scratch: 4.6 to 19.3 TFLOPS
The first three versions established a baseline and squeezed out what scalar math can offer.
Naive scalar (4.6 TFLOPS, 0.5% peak): One thread computes one output element. Every A and B value is loaded fresh from HBM for every multiply – no data reuse at all.
__global__ void matmul_naive(const bf16* A, const bf16* B, bf16* C, int M, int N, int K) {
    int row = blockIdx.y * blockDim.y + threadIdx.y;
    int col = blockIdx.x * blockDim.x + threadIdx.x;
    float sum = 0.0f;
    for (int k = 0; k < K; k++)
        sum += (float)A[row*K + k] * (float)B[k*N + col];
    C[row*N + col] = (bf16)sum;
}
// blockDim=(16,16). Entirely memory-bandwidth-bound.
Shared memory tiling (9.3 TFLOPS, 2x): Load 128x16 tiles of A and B into shared memory. Each thread now computes an 8x8 output block – 64x more compute per load from SMEM. Still fp32 scalar math, but data reuse cuts HBM traffic dramatically.
// BM=BN=128, BK=16, 256 threads
__shared__ float sA[128][16], sB[16][128];

for (int bk = 0; bk < K; bk += BK) {
    cooperative_load(A, sA, bk);  // all 256 threads load tile
    cooperative_load(B, sB, bk);
    __syncthreads();
    for (int k = 0; k < BK; k++)
        for (int i = 0; i < 8; i++)
            for (int j = 0; j < 8; j++)
                acc[i][j] += sA[row+i][k] * sB[k][col+j];
    __syncthreads();
}
Native bf16 in SMEM (19.3 TFLOPS, 2x): Storing bf16 natively halves the shared memory footprint, allowing a larger K-tile (BK=32). Transposing A improves coalesced access. But at 2% of peak, scalar arithmetic is clearly the bottleneck – the GPU’s tensor cores are sitting idle.
The inflection point: tensor cores (489 TFLOPS, 25x)
This is where the kernel stops being a toy. Hopper introduces three low-level PTX instructions that change the game:
wgmma.mma_async(Warp Group Matrix Multiply) – a single instruction computes a 64x128x16 matrix multiply across 128 threads, replacing thousands of scalar FMAscp.async.bulk.tensor(TMA, Tensor Memory Accelerator) – a hardware DMA engine that loads 2D tiles directly from HBM to shared memory, bypassing the register filembarrier(asynchronous barriers) – producer-consumer synchronization with phase tracking, enabling pipelined data movement without__syncthreads()overhead
Switching from scalar FMA to WGMMA yields the single largest jump in the entire campaign:
// m64n128k16: one instruction = 262,144 FMAs
asm volatile(
    "wgmma.mma_async.sync.aligned.m64n128k16.f32.bf16.bf16 "
    "{%0,...,%63}, %64, %65, 1,1,1,0,0;"
    : /* 64 fp32 accumulators */
    : /* SMEM descriptor A */ "l"(descA), /* SMEM descriptor B */ "l"(descB)
);
Combined with a triple-buffered cp.async pipeline, a 128-byte swizzled SMEM layout, and 2 warp groups (256 threads), this reaches 489 TFLOPS – 68% of cuBLAS. The remaining gap is all about feeding data to the tensor cores fast enough.
Warp specialization: 581 to 623 TFLOPS
The next step is to stop treating all threads equally. Instead of having every thread both load data and compute, we dedicate warp groups to specialized roles:
| Warp Group | Role | Work |
|---|---|---|
| WG0 (128 threads) | Producer | TMA bulk loads from HBM to SMEM |
| WG1 (128 threads) | Consumer | WGMMA on top 64 rows |
| WG2 (128 threads) | Consumer | WGMMA on bottom 64 rows |
Producers and consumers communicate through asynchronous barriers (mbarrier), so data movement and computation overlap cleanly:
if (wg == 0) {  // PRODUCER
    mbar_wait(empty_barrier, phase);
    asm("mbarrier.arrive.expect_tx.shared.b64 _, [%0], %1;" :: "r"(full_bar), "r"(tx_bytes));
    asm("cp.async.bulk.tensor.2d.shared::cluster.global.tile.mbarrier::complete_tx::bytes"
        " [%0], [%1, {%2,%3}], [%4];" :: "r"(smem_dst), "l"(&A_tma), "r"(k*BK), "r"(row), "r"(full_bar));
} else {  // CONSUMER
    mbar_wait(full_barrier, phase);
    wgmma_m64n256k16(acc, descA, descB);  // 128 fp32 accumulators
    asm("mbarrier.arrive [empty_barrier]");
}
With the output tile widened to BN=256 (using the m64n256k16 WGMMA variant), a quad-buffered pipeline, and a persistent kernel (132 CTAs, one per SM), performance reaches 623 TFLOPS – 87% of cuBLAS.
Closing the gap: epilogue, L2 policy, and grid swizzle (649 to 690 TFLOPS)
The remaining distance is in the details.
SMEM-staged epilogue with bank-conflict padding. Naive scattered stores from accumulators waste bandwidth. Staging results through SMEM with BN_PAD = BN + 8 padding breaks 8-way bank conflicts, then allows coalesced 128-bit stores to global memory. This alone adds 37 TFLOPS (+6%).
constexpr int BN_PAD = BN + 8;  // breaks 32-bank alignment conflicts

// 1. Write accumulators to padded SMEM
*((__nv_bfloat162*)(stage + row * BN_PAD + col)) = __floats2bfloat162_rn(acc[i], acc[i+1]);

// 2. Named barrier sync within warp group
asm("bar.sync %0, %1;" :: "r"(1 + cwg), "r"(128));

// 3. Coalesced 128-bit stores to global
uint4 val = *((uint4*)(stage + r * BN_PAD + c8 * 8));
asm("st.global.cs.v4.b32 [%0], {%1,%2,%3,%4};" ...);
L2 cache policy. Setting L2_PROMOTION_NONE stops the GPU from promoting streaming data into L2 – data that’s read once and never reused was evicting tiles that are. +4%.
Grid swizzle. Remapping CTA indices into 4x4 super-tiles improves L2 spatial locality. Nearby CTAs access nearby memory, reducing cache line evictions:
constexpr int SBLOCK = 4;
int linear_idx = blockIdx.y * gridDim.x + blockIdx.x;
int super_idx = linear_idx / (SBLOCK * SBLOCK);
int local_idx = linear_idx % (SBLOCK * SBLOCK);
int bm = (super_idx / super_n) * SBLOCK + local_idx / SBLOCK;
int bn = (super_idx % super_n) * SBLOCK + local_idx % SBLOCK;
Beating cuBLAS: 745 to 751 TFLOPS (1.05x)
The final push involves two changes that a general-purpose library like cuBLAS can’t easily justify.
Cached TMA descriptors (+79 TFLOPS). cuBLAS must handle arbitrary matrix shapes, so it creates TMA descriptors and transposes on every call. Our kernel targets a fixed shape, so it caches the transposed B matrix and TMA descriptors across calls, saving ~21us per invocation. This was the largest single gain in the entire campaign.
Fully unrolled K-loop (+6 TFLOPS). Unrolling by QSIZE=4 with individual register variables (instead of arrays the compiler spills to local memory) eliminates all stack usage – a zero-byte stack frame:
// Instead of: int fph[QSIZE];  -> compiler spills to local memory
// Use individual registers:
int fph0 = 0, fph1 = 0, fph2 = 0, fph3 = 0;
uint32_t fb0 = full_base, fb1 = full_base+8, fb2 = full_base+16, fb3 = full_base+24;

// Slot 0 -- fully explicit, no array indexing
mbar_wait(fb0, fph0); fph0 ^= 1;
asm("wgmma.fence.sync.aligned;");
for (int ki = 0; ki < 4; ki++) wgmma_m64n256k16(acc, daB0 + ki*2, dbB0 + ki*2);
asm("wgmma.commit_group.sync.aligned;");
asm("wgmma.wait_group.sync.aligned 0;");
asm("mbarrier.arrive [eb0]");
// Slots 1, 2, 3: identical pattern...
 Code evolution: 50 lines of naive C became 280+ lines of PTX inline assembly.
Part I summary
| # | Technique | TFLOPS | % Peak |
|---|---|---|---|
| 1 | Naive scalar (1 thread/element) | 4.6 | 0.5% |
| 2 | SMEM tiling + 8x8 register tile | 9.3 | 0.9% |
| 3 | Native bf16 SMEM, BK=32, transposed A | 19.3 | 2% |
| 4 | WGMMA m64n128k16 + cp.async triple-buf | 489 | 49% |
| 5 | Workspace caching + streaming stores | 581 | 59% |
| 6 | Warp specialization, BN=256, 3 WGs | 612 | 62% |
| 11 | m64n256k16 WGMMA | 623 | 63% |
| 15 | SMEM epilogue + bank-conflict padding | 659 | 67% |
| 18 | L2 cache policy (PROMOTION_NONE) | 688 | 70% |
| 19 | Grid swizzle (SBLOCK=4) | 690 | 70% |
| 21 | Cached TMA descriptors | 745 | 75% |
| 22 | Fully unrolled K-loop, zero stack frame | 751 | 76% |
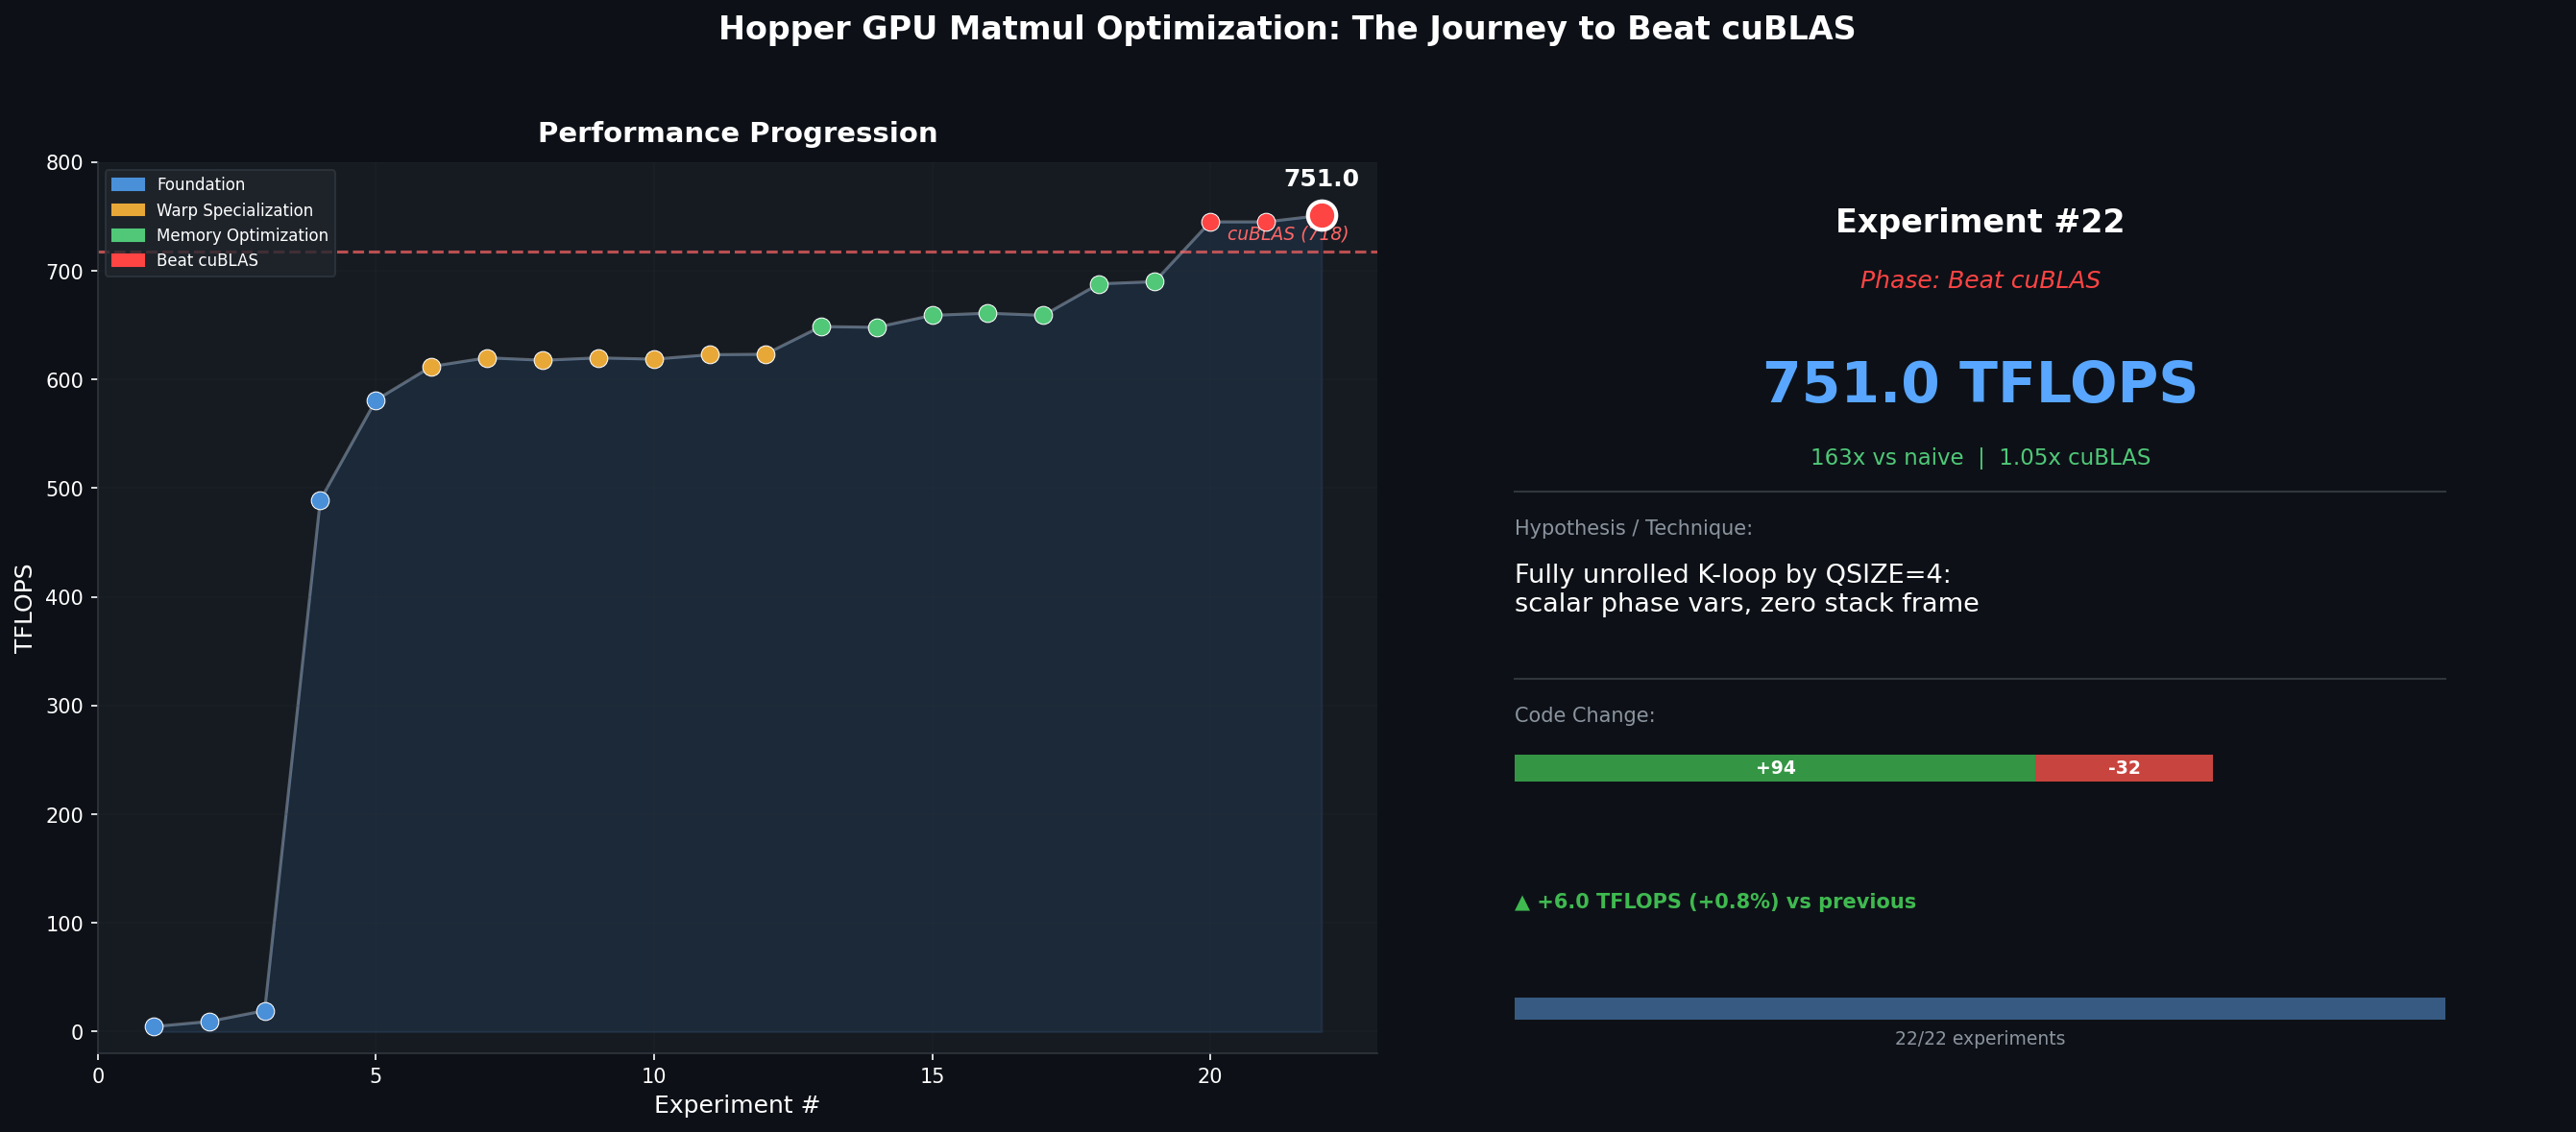 751 TFLOPS = 76% of theoretical peak. cuBLAS beaten by 5%.
Part II – SW-HW Co-Design on a 32-SM Edge Architecture
In Part I we optimized software against fixed hardware. But in system architecture optimization the question is reversed: given a specific workload, what hardware should we build?
This is the domain of software-hardware co-design – iterating on both the kernel and the microarchitecture together to find a global optimum that neither axis could reach alone. It matters most for edge inference ASICs and custom accelerators, where target workloads are known at tape-out time. A few percent cycle reduction in a fixed power/area budget can mean the difference between meeting or missing a latency SLA.
The setup
- Hardware: 32-SM A100-class “edge inference” accelerator, simulated cycle-accurately with GPGPU-Sim / Accel-Sim
- Problem: M=N=K=4096 WMMA matmul, FP16 tensor core (137.4 GFLOP)
- Theoretical minimum: ~2.1M cycles (100% tensor core utilization, zero stalls)
- Result: 7.8M to 3.58M cycles (-54.3%), reaching 58.6% of theoretical peak
 Cycle reduction across software optimization, architecture co-design, and combined phases.
How the campaign works
The co-design campaign follows five phases. First, we establish a baseline (Phase A). Then we optimize the kernel software only (Phase B) – changing tile sizes, pipeline depth, persistence, and warp tiling while the architecture stays fixed. After validating against an analytical model (Phase C), we freeze the best kernel traces and modify the GPU configuration instead – scheduler policy, memory latencies, SMEM banks (Phase D). Finally, we cross the best software variants with the best architecture configs to search for a global optimum (Phase E).
The baseline
The starting kernel is a persistent WMMA matmul with 2x2 warp tiling:
// Persistent WMMA matmul -- baseline configuration
constexpr int BLOCK_M = 64, BLOCK_N = 128, BLOCK_K = 32;
constexpr int WARP_TILES_M = 2, WARP_TILES_N = 2;  // 2x2 = 32x32 output/warp
constexpr int N_PERSISTENT = 64;  // 2 blocks/SM

for (int tile = blockIdx.x; tile < total_tiles; tile += gridDim.x) {
    for (int k = 0; k < k_tiles; k++) {
        wmma::mma_sync(acc[mi][ni], frag_A[mi], frag_B[ni], acc[mi][ni]);
    }
}
// Result: 7,836,335 cycles, 26.8% peak efficiency, 25% occupancy
The bottleneck profile tells the story: 84% idle cycles, 68% scoreboard stalls, 50.3M shared memory bank conflicts. The hardware is mostly waiting.
Phase B: software optimization (3 rounds, 70+ variants)
Round 1 – K-tile tuning. The most impactful single change was doubling the K-tile from 32 to 64 (BLOCK_K=64). This halves the number of K-loop iterations, and each iteration carries fixed overhead – synchronization barriers, pipeline commits, loop control. Fewer iterations, same total data through the tensor cores, and IPC jumps from 768 to 886. Result: -13% cycles.
Interestingly, adding more pipeline stages hurt. Three stages required 50% more SMEM per block, reducing occupancy. Four stages doubled SMEM usage and collapsed occupancy to 12.5%, adding 35% more cycles. The cure was worse than the disease.
| Variant | Cycles | Change | Key idea |
|---|---|---|---|
| baseline | 7,836,335 | – | 64x128 tiles, BK=32, 64 persistent blocks |
| BLOCK_K=64 | 6,819,271 | -13.0% | Halve K-loop iterations |
| 256 persistent blocks | 7,211,995 | -8.0% | More blocks in flight |
| 3 pipeline stages | 7,890,820 | +0.7% | SMEM pressure cancels benefit |
| 4 pipeline stages | 10,588,275 | +35.1% | Occupancy collapse |
Round 2 – combining winners. K=64 and 256 persistent blocks work together: K=64 reduces per-iteration overhead, while 256 blocks (8 per SM) give the scheduler more warps to hide memory latency. The combination reached -17.2% vs baseline, better than either alone.
| Variant | Cycles | Change | IPC |
|---|---|---|---|
| K=64 + 256 persist | 6,488,490 | -17.2% | 932 |
| K=64 + 128 persist + 3-stage | 6,689,957 | -14.6% | 1028 |
| K=64 + 128 persist | 6,744,354 | -13.9% | 896 |
The three-stage variant actually achieved higher IPC (1028 vs 932), but the extra SMEM cost limited occupancy – the simpler two-stage pipeline with more blocks won overall.
Round 3 – 4x4 warp tiles (the biggest single win). This was the most important optimization in the entire co-design campaign. The insight: with 2x2 warp tiling, each warp loads 4 A fragments and 4 B fragments, then issues 4 WMMA instructions – a 1:1 compute-to-load ratio. With 4x4, each warp loads the same 4+4 fragments but issues 16 WMMA instructions (every A x B combination). Same loads, 4x more compute:
// 2x2: 8 loads, 4 WMMA (1:1 ratio)
for (mi = 0; mi < 2; mi++)
    for (ni = 0; ni < 2; ni++)
        wmma::mma_sync(acc[mi][ni], frag_A[mi], frag_B[ni], acc[mi][ni]);

// 4x4: 8 loads, 16 WMMA (2:1 ratio) -- 29% fewer total instructions
for (mi = 0; mi < 4; mi++)
    for (ni = 0; ni < 4; ni++)
        wmma::mma_sync(acc[mi][ni], frag_A[mi], frag_B[ni], acc[mi][ni]);
One complication: 4x4 tiles quadruple the accumulator register count (16 fragments vs 4), increasing register pressure. To compensate, the K-tile was shrunk back to 32, which freed enough SMEM for 128 persistent blocks (4/SM) instead of 64.
4x4 warp tiles added +21 percentage points of peak efficiency in a single change – more than any architectural modification in the entire campaign.
Phase D: architecture co-design (11 configurations)
With the best kernel frozen, we modified the simulated GPU microarchitecture – one parameter at a time, then in combination.
| Configuration | Cycles | Change | What changed |
|---|---|---|---|
| Stock architecture | 6,819,271 | – | Reference |
| All optimizations | 6,052,807 | -11.2% | Combined below |
| GTO scheduler | 6,429,761 | -5.7% | Greedy-then-oldest scheduling |
| GTO + fast tensor + 128K regs | 6,429,233 | -5.7% | Compute upgrades on top of GTO |
| Faster DRAM + L2 | 6,515,169 | -4.5% | DRAM latency 190 to 100, L2 ROP 200 to 120 |
| 64 SMEM banks | 6,811,726 | -0.1% | Doubled from 32 |
| 2x faster tensor cores | 6,841,969 | +0.3% | No measurable benefit |
| Wider interconnect | 6,819,271 | 0.0% | Zero effect |
Three results stand out:
GTO scheduling dominates (-5.7%, zero area cost). The default round-robin scheduler (LRR) gives each warp equal time slices. With low occupancy, warps frequently stall on memory or scoreboard dependencies, and LRR dutifully switches to the next warp – which is also stalled. GTO (greedy-then-oldest) instead keeps one warp running as long as it can issue, then picks the oldest ready warp. This maximizes the chance that the next warp has its data ready. Same hardware, better policy.
Faster tensor cores don’t help (+0.3%). This is counterintuitive but reveals the real bottleneck. The kernel isn’t tensor-compute-bound – it’s memory-system-bound and scheduler-stall-bound. Halving tensor latency just means the warp finishes its WMMA faster and waits longer for the next data tile.
Wider interconnect has zero effect. The kernel’s L2 hit rate is 89.5%. Almost all traffic stays on-chip, so the interconnect between SMs and memory controllers is barely utilized.
Phase E: crossing software and architecture (the payoff)
The real insight of co-design: optimizations along different axes are super-additive.
| Configuration | Cycles | Change | Peak Efficiency |
|---|---|---|---|
| Baseline (stock HW) | 7,836,335 | – | 26.8% |
| Best SW only (stock HW) | 6,488,490 | -17.2% | 32.3% |
| Best arch only (stock SW) | 6,052,807 | -22.7% | 34.7% |
| Best SW x best arch | 5,655,094 | -27.8% | 37.1% |
SW alone: -17.2%. Arch alone: -22.7%. But combined: -27.8%, better than the sum would predict. The reason: once the software saturates the compute path (K=64, high persistence), the remaining bottleneck is data delivery – DRAM latency and L2 bandwidth. Architecture memory improvements become more impactful when paired with good software, not less. The best architecture depends on what the software has already optimized away.
Reaching 58.6% peak
Further rounds explored deeper structural changes – 4x4 warp tiling (as described above), 8-warp configurations, aggressive register pressure reduction via __launch_bounds__, and multi-stage pipeline sweeps. The best overall result combined the 4x4 warp-tiled kernel with the optimized architecture:
 Bar chart race showing cycle improvements across all campaign phases.
| Rank | Configuration | Cycles | Change | Peak Eff. |
|---|---|---|---|---|
| 1 | 4x4 tiles + optimized arch | 3,580,195 | -54.3% | 58.6% |
| 2 | Earlier 4x4 variant + optimized arch | 4,063,235 | -48.1% | 51.6% |
| 3 | 4x4 tiles on stock arch | 4,709,235 | -39.9% | 44.5% |
| 4 | K=64 + 256 persist + optimized arch | 5,655,094 | -27.8% | 37.1% |
| 5 | K=64 + 256 persist (SW only) | 6,488,490 | -17.2% | 32.3% |
| – | Baseline | 7,836,335 | – | 26.8% |
Takeaways
- Tensor cores are the inflection. Switching from scalar math to WGMMA yielded a 25x jump (19.3 to 489 TFLOPS). Nothing else comes close.
- The last 20% is 80% of the work. Going from 489 to 751 TFLOPS required epilogue tuning, L2 policy, warp specialization, and register allocation – each contributing single-digit percentages.
- Beating cuBLAS requires workload-specific tuning. Cached TMA descriptors and shape-specific unrolling are optimizations a general library can’t justify.
- Compute-to-load ratio is the most important knob. 4x4 warp tiles (+21 pp of peak efficiency) outperformed every architectural change in the co-design campaign.
- Co-design is super-additive. The best architecture depends on the kernel, and vice versa. Memory optimizations become more impactful once software already saturates compute.
- Scheduling policy is free performance. GTO matched the combined effect of doubling tensor core speed and adding 128K registers – at zero area cost.
AutoDiscovery – 2026